
Over the past 50 odd years we sent robotic probes to explore our solar system and they have sent back amazing close up images of the planets, asteroids and comets but how did they take these images and what sorts of issues are there in taking photos in deep space and getting back to the earth.
In a previous video we looked and how the first spy satellites used film to get the best quality available at the time because electronically transferring images back to earth wasn’t of a high enough quality for the reconnaissance purposes. They were in orbit a few hundred kilometres above the earth, so they could drop the film back to earth but for the first space probes going to the Moon, Mars, Venus and beyond that wasn’t an option.
In 1959 Luna 3 became the first spacecraft to photograph the far side of the moon ironically using captured film that was temperature and radiation resistant which had been recovered from US Genetrix spy balloons that had been shot down by the Soviets.
The camera it used was a dual lens system with a 200mm wide angle that could image the whole moon in one shot and a 500mm for close up shots of regions of the moon, though closeup wasn’t really that close as Luna 3 took the images of the far side from around 65,000 km. The camera was also fixed to the body of the craft, so Luna 3 was the first craft to use 3 axis rotation to position its self to take the images.
Once the images had been taken, they were developed, fixed and dried onboard and then scanned electronically by passing the film between a flying spot scanner and a light sensitive sensor. A dot of light from the flying spot scanner traversed the film at a resolution of 1000 lines per 35mm frame, this varying level of light was converted to an electronic signal and transmitted back to earth. Here it was shown on a slow scan TV and then that image was photographed and became what the rest of the world saw.
The poor quality of the images are hardly surprising once you take in to account that at each stage of processing the image quality was reduced more and more. However, it was 1959 and the first time this had been done and they were still good enough to show that the far side of the moon was very different to the Earth facing side.
The very first image of Earth from farther away than low earth orbit was by Explorer 6 also in 1959 from 27,000km and was part of a test of all electronic scanning system to measure cloud cover, this image is of the sunlit clouds above the central pacific though it’s hardly what you would call good.
Compare that to the “Blue Marble” shot of the entire earth by the crew of Apollo 17 in 1972 whilst on its way to the moon using a 70mm Hasselblad with an 80m Zeiss lens.
Things had to change a lot if we were to send space probes tens or hundreds of millions of kilometers to the planets and see something better than the blurry images we could get from the best telescopes on earth.
In 1964 Mariner 4 became the first spacecraft to do a flyby of Mars and take close up images.
Unlike Luna 3, Mariner 4 used a slow scan Vidicon TV tube to gather the images of Mars. The analogue signal output was then converted to a digital one and stored on a magnetic tape recorder, the predecessor to today’s hard drives.
After the camera finished taking pictures they were replayed back from the tape and sent back to earth for processing at JPL.
Because it was going to take the computer a long time to create the images, we are talking of a 1964 mainframe here, and the need to get an something out quickly to the press, when the first image data was received, one of the team at NASA used crayons from a local art store to colour in the strips of data that they saw on the monitor screen, a bit like painting by numbers and this became the first image of another planet.
When the actual monochrome version was assembled and printed out by the computer it was surprising how well the hand drawn version looked in comparison and that is now on display at the JPL labs in Pasadena, California.
In 1975 the Soviets became the first to successfully take pictures from the surface of another planet, this time is was Venus. They knew that the US were planning the Viking Mars lander but due to budget restraints and issues with the long term reliability of their navigation they chose Venus as a closer target. But Venus makes a Mars landing look like a walk in the park. When it landed it recorded an atmospheric pressure 90 times that of earth and the temperature was 485 C.
Although the surface of Venus is completely obscured by thick clouds, the pictures it sent back show the surface as been about the same brightness as an overcast summers day on earth with good visibility and little atmospheric dust with rocks scattered around the lander.
To get the images back to earth the lander relayed the pictures back to earth via the orbiter which had carried the lander, this was also the first craft to orbit Venus.
The lander had two 180 degree cameras which would have given a full 360 degree view but the lens cover of one failed to detach on landing. The cameras themselves were photographic scanning devices with moving mirrors. The resolution of each was about 70,000 pixels made up of 500 by 128 pixels. Although it was thought that the heat and pressure destroyed the lander after 53 minutes, a soviet source said that the transmission stopped because the orbiter had moved out of the communication range of the lander.
Taking pictures of a planet 100’s of millions or billions of kilometres away poses many problems. Firstly there is the lack of light. The amount of sunlight is about 1000 times less when you get out to the distance of Pluto. High noon on Pluto is the equivalent of what NASA calls Pluto time on earth, around dusk and dawn roughly when you would have to turn on your headlights on in a car. Taking images of asteroids is even harder and is akin to photographing a piece of coal in moonlight whilst travelling faster than a bullet.
This means that the camera exposures must be much longer to gather enough light but then the speed of the space craft, New horizons for example is travelling at 16.2km per second, almost 60,000km/h which would introduce motion blur if the cameras don’t exactly track the object they are flying by.
And it not as if you can just press a button here on earth and they will take a picture on the spacecraft. The distances are so great that it takes 4-1/2 hours to send a radio signal to Pluto at the speed of light. So everything has to be pre-programmed and timed to the second in order to turn the camera or spacecraft at the correct speed at the correct time to get the exposure without motion blur, all that is done by the craft itself. Only hours or days after will the teams on earth know if it has worked correctly.
Then there is the radiation, not only cosmic rays from deep space but around the planets themselves. Just like the earth’s magnetic field captures and concentrates charged particles from the Sun in the Van Allen Belts, Jupiter and Saturn do the same, only on a much larger scale.
Due to the interaction of Jupiter’s rings, Yes, it has rings like Saturn just much smaller and volcanic emissions from Jupiter’s moon Io, there are area’s of intense radiation around Jupiter some 10,000 times that of the Van Allen belts around the earth.
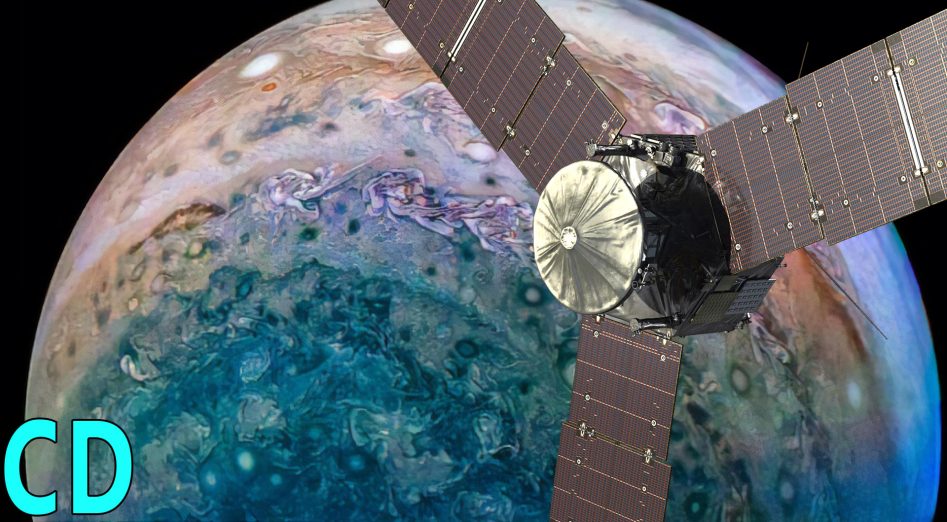
So the camera’s and electronics on spacecraft like the Juno Jupiter Orbiter launched in 2011 which will fly closer to Jupiter than any other craft are especially radiation hardened. The CPU on Juno is rated to withstand 1 million RADs and 20 million RAD’s over time. If a human were exposed to 1000 RADs for a few hours the results would be almost invariably fatal.
The CPU and other electronics are encased in a radiation vault which has up 25mm thick titanium walls which reduces the radiation by a factor of 800.
The camera itself uses a Kodak KAI-2020 sensor with a resolution of 1600 by 1200 pixels with modifications and a special housing to mitigate the intense radiation.
The power supply and the length of time that it has for
The Voyagers used two cameras which were modified versions of the slow scan vidicon tubes used on the earlier Mariner missions. One has a low resolution 200 mm wide-angle lens with an aperture of f/3, while the other uses a higher resolution 1500 mm narrow-angle f/8.5 lens. The resolution of the images after they had been digitised was just 800 x 800 pixels.
Although we see colour images taken by Voyager, they only sent black and white images. Each camera has 8 coloured filters in a commandable wheel that they rotates in front of the camera.
So for a colour image they would take 3 monochrome images each one through a different filter usually red, green and blue. These three images would be combined to make a full colour image when they were received back on earth.
Using this method, they can get a higher resolution image than if the camera used a colour camera Tube. Often they might need to take images in the part of the spectrum that we cant see like infrared or ultraviolet, so a Monochome camera and filter combination works much better.
The cameras on Voyager could take up to 1800 images day, far quicker than the could be sent back to earth. These were stored on a magnetic tape like in the Mariner probes. The digital data would then be relayed back to earth at a speed of about 7.2 kilobits per second at a distance of around that to Jupiter.
With a picture taking up about 5.2 megabits of data and allowing for only a basic compression method available at that time and error correction that sent extra data in case some of the signal was lost it would take about 4-5 minutes to send each image, so for a full days’ worth of 1800 images would take just over 6 days to send them back to Earth.
By the time the voyagers were at the distance of the outer planets the bandwidth of the data had dropped to around 160 bits per second. At this speed it now takes 9 hours to send one image and 1800 images would take 1.8 years.
Even on modern spacecraft the data rates are very slow compared to what we are used to. New Horizons data rate from Pluto in 2015 was just 2k bits per second and its even farther out now. This is why it will take up to a year to send back all the images of Ultima Thule taken in Dec 2018.
Something that a lot of people don’t realise is that the pictures we see are mostly for public consumption and PR but not that important from a scientific point of view. Most of the real science work is done by the other instruments that are carried on board
JunoCam was put on the Juno Jupiter Orbiter primarily for public science, greater public engagement, and to make all images available on NASA’s website. Its low resolution, fixed mounting to the spacecraft body lead to being referred by some as Juno’s dashcam. It was designed to survive 8 orbits around Jupiter but as of 2018 it had survived 17 and has now being tasked with more scientific duties as well.
If you are wondering why these billion dollar spacecraft don’t have the latest multi-megapixel cameras it’s because they need reliability above everything else so they use tried and trusted technology which at the time of the design is often a decade or more old. It then takes year to build and launch, again working with the original trusted design where possible.
When New Horizons was launched in 2006 it was already nearly a 15 year old design and it wouldn’t arrive at Pluto for another 9 years. Using this method of tried and trusted technology has proven self-many times now with best know examples of voyager 1 and 2 working for the best part of 50 years and maybe more if their nuclear power supplies can hang on in there a little longer.
All of the missions we have launched to photograph and find out more about our solar system have unforeseen issues which have had to fixed with the craft hurtling through space millions or billions of km from earth, problems that tax their creators and operators every bit as much as did their original design did all those years ago.
If you would like to challenge yourself then our sponsor for this video, Brilliant.org has something that will be right up your street.
Brilliants Dailey problems provides you with a challenge and the context and framework that you need to work them out, so that you learn the concepts by applying them. If you like the daily problem, then there’s more like it so that you can explore the concept in greater detail and develop your framework. If you are confused and need more guidance, then join the community in discussing these problems. These thought provoking challenges will lead you from curiosity to mastery, one day at a time.
So what are you waiting for? Go to Brilliant.org/curiousdroid and finish your day a little smarter and the first 200 of you to do so will get 20% off the annual subscription and to view all problems in the archives.